Wondering if your iPhone location is being monitored? You’re right to be cautious. This article will show you the telltale signs that someone may be tracking you and offer straightforward ways to secure your privacy.
Ready to reclaim your peace of mind? It’s just a few scrolls away.
In a hurry? We care about your time, so here’s a quick answer to the question you’re looking for!
The iPhone doesn’t send notifications when someone checks your location. However, you can spot clues. Look for the Location Services icon in your status bar; if it’s active, your location is being shared. Check for tracking apps that might have a notification icon. The Find My Friends app will list friends tracking you. Battery usage for “Location Services” can also indicate tracking. Keep your privacy intact by managing Location Services settings and being cautious with app permissions.
iPhone Location Services
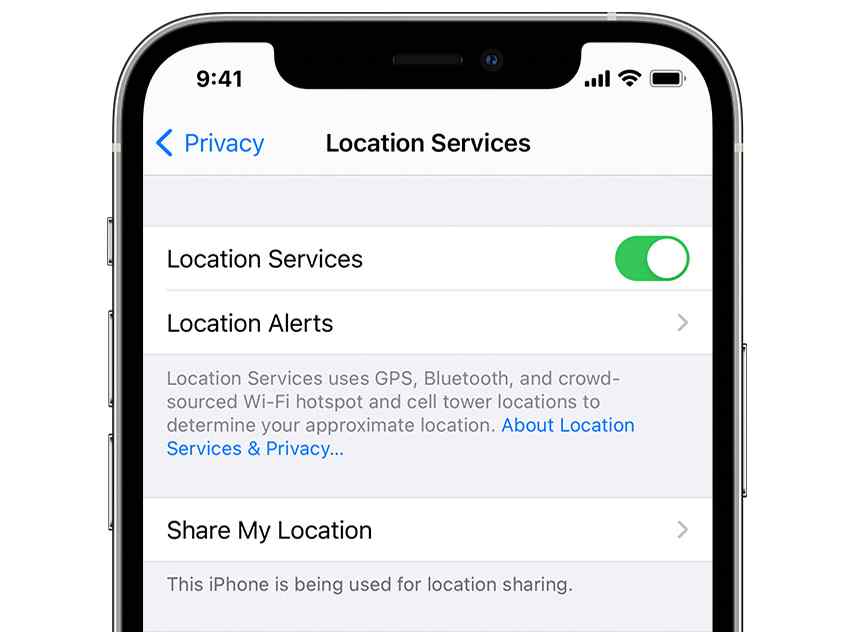
Have you ever questioned how your iPhone’s Location Services work, or if someone’s monitoring your location? Let’s take a look!
Your iPhone utilizes a system known as Location Services, which uses GPS, Wi-Fi hotspots, and cellular towers to calculate your approximate location. This feature can be allowed for particular apps, such as maps or social media platforms.
It’s essential to be aware that when someone tracks your location through an app like Find My Friends or Messages, there’s no direct way you’ll be informed. But don’t worry! You have control over who can view where you are at any given time by adjusting privacy settings on your device.
Now that we’ve gone over the fundamentals of Location Services, let’s explore how you can view your own location history on your iPhone.
How To Check Your Location History On iPhone
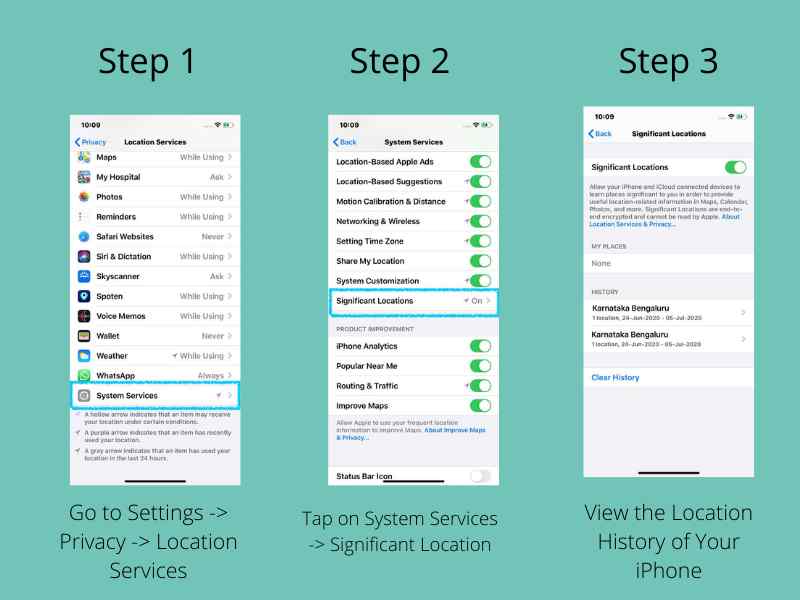
Want to know where you’ve been lately? Your iPhone can tell you just that. By enabling Location Services and viewing your Location History, you can easily track the places you’ve visited.
Don’t worry, it’s not as complicated as it sounds, and with clear step-by-step instructions (and maybe a few screenshots), we’ll have you navigating this feature in no time!
Enabling Location Services
To enable Location Services on your iPhone, you’ll need to dive into your settings menu like a treasure hunter seeking hidden gems.
Start by tapping the grey ‘Settings’ gear icon located on your home screen. It might appear intimidating at first glance, but don’t worry!
Scroll down until you find the ‘Privacy’ option and give it a tap.
Once there, you’ll see ‘Location Services’ sitting at the top of the list. Tap on it and slide that little green switch over to light up this feature. This means Location Services are now active and apps can use your location data when necessary.
Now that we’ve unearthed this essential tool, let’s take a closer look at how to view where our digital footprints have been left behind in the ‘viewing location history’ section.
Viewing Location History
Uncovering where you’ve been in the past isn’t difficult, you just need to know where to look and take the right steps.
Open your iPhone’s settings, scroll down, and tap on ‘Privacy’. Then, tap on ‘Location Services’. Scroll down this list until you find ‘System Services’ and select it. You’ll find an option called ‘Significant Locations’, select that.
You’ll now be able to view the history of places you’ve been to, including the exact location, dates, and duration of stay.
These details can be useful in various scenarios. But what if someone else is viewing this data? Let’s explore how to find out if someone else has been tracking your location with their iPhone.
How to Tell if Someone is Checking Your Location on iPhone
Curious about whether someone is checking your location on your iPhone? Well, there’s no direct way to tell. Apple values privacy, so they don’t provide a feature that notifies you when someone accesses your location data.
If you’ve shared your location with someone via ‘Find My Friends’ or ‘Messages,’ they can find where you are without you knowing. However, if any new app requests access to your location, a pop-up will appear asking for permission.
The best way to manage this is by regularly checking Location Services in the Privacy section of Settings and seeing which apps have access. It’s worth understanding which common apps may track your location.
Common Apps That Might Track Your Location
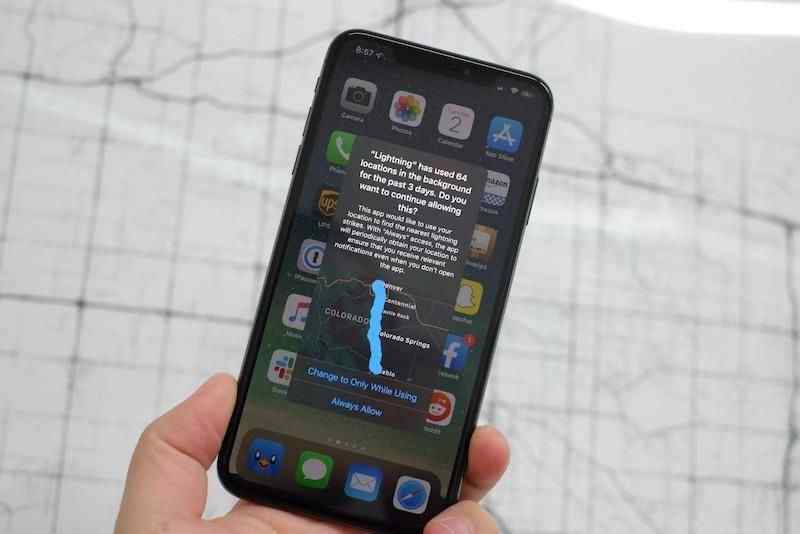
It’s essential that you’re aware of the likely culprits when it comes to apps that might be tracking your whereabouts. Apps such as Facebook, Google Maps, and Uber routinely monitor your location for various reasons.
Facebook uses your location to show appropriate content and ads, while Google Maps needs it to provide precise directions. Uber tracks your location to locate nearby drivers.
Be wary of weather apps and shopping apps; they often ask for access to your location data as well.
Some games may even ask for this information! Remember: any app that requests permission to use your location could potentially keep track of where you are.
Now let’s move on to discuss how you can more securely protect your iPhone from potential spying eyes regarding your whereabouts.
How to Secure Your Location on iPhone?
Securing your location on your iPhone is easier than you might think. You can turn off Location Services, use a VPN to mask your IP address, install a tracking blocker to guard against advertisers and third parties, opt for a privacy-friendly web browser that doesn’t track your online activity, or even go incognito when browsing.
Let’s delve into these methods and show you how each one helps maintain the confidentiality of your whereabouts.
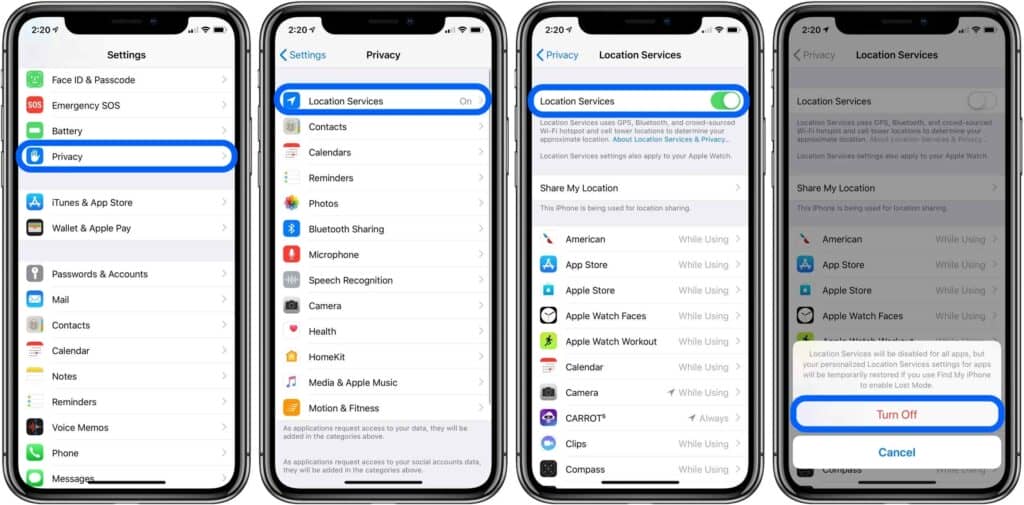
1. Turn off Location Services
To protect your privacy, you’d want to shield a love letter in an old Victorian era – much like turning off Location Services on your iPhone.
This feature allows apps and websites to use information from cellular, Wi-Fi, GPS networks to determine your approximate location.
However, by turning this off, you can ensure that no one is able to check where you are.
Here’s how:
- Go into ‘Settings’ on your iPhone.
- Tap on ‘Privacy’.
- Select ‘Location Services’.
From here, you can either turn off all Location Services by swiping the switch at the top of the screen or pick specific apps that shouldn’t have access. Bear in mind, without this service, some functionalities might be compromised.
After that, we can look into using a VPN as another valuable tool for maintaining privacy.
2. Use a VPN
After learning how to turn off your iPhone’s location services, you could be looking for another way to guard your privacy. The Virtual Private Network (VPN) could be the answer.
A VPN hides your Internet Protocol (IP) address, making it hard for anyone to recognize your exact location. It’s like a digital mask that hides your real address behind another one.
To implement a VPN on your iPhone, just download a reputable VPN app from the App Store, install it, and follow the setup instructions. It’s simple and efficient!
Now you have an extra layer of security while browsing the web with peace of mind. Ready for more? Let’s explore using tracking blockers next for improved privacy protection.
3. Use a Tracking Blocker
Exploring the domain of digital privacy, it’s time to think about using a tracking blocker on your device. These are useful tools that stop others from detecting your data and location when using applications.
Here are four reasons why you might want to use a tracking blocker:
- It prevents apps from sharing your location with third parties.nn2. It stops targeted advertising based on your whereabouts.nn3. It gives you more control over who has access to your data.nn4. It grants greater privacy, giving you peace of mind.
Simply download a reliable tracking blocker from the app store and set it up following the instructions. Working with such settings may sound difficult at first, but it’s worth the effort for increased security!
Now that we’re done with that, let’s take a look at an even more private alternative: using a privacy-friendly web browser for our internet activities.
4. Use a Privacy-Friendly Web Browser
Have you ever considered how much data your web browser accumulates about you? It’s a great deal more than you may anticipate.
Certain browsers record your location, accumulate data about your browsing behavior, and even offer this data to sponsors.
Fortunately, there are privacy-friendly web browsers available that can help defend your online whereabouts. Take into consideration using browsers like Firefox Focus or DuckDuckGo.
These instruments are built to respect user privacy by blocking trackers and not gathering personal data. Consider perusing the web without worrying about somebody snooping on your location – quite a relief, isn’t it?
Nevertheless, while these choices give an extra layer of security, they aren’t foolproof. For extra security when browsing delicate content or if you need to stay completely off the radar, contemplate going covert with incognito mode next time.
5. Use Incognito Mode
It’s quite startling to discover that, as reported by the Pew Research Center, 64% of Americans have had a large data breach experience. Incognito mode can be a great aid in reducing your digital presence and guarding your privacy.
When you use incognito mode on your web browser, your browsing history is not saved. Cookies are removed once you close the window.
This implies that no one else using the same device can view what you’ve been up to online. Still, remember this: your Internet Service Provider or employer could still monitor what websites you visit, and websites could recognize you through digital fingerprints.
So, while not foolproof, incognito mode is a valuable tool for maintaining some level of privacy when exploring locations or other confidential information on an iPhone.
Conclusion
So, you’ve mastered the location services on your iPhone and know how to review your own history.
You also know how to detect if someone is snooping around your location. We’ve also discussed common apps that might be secretly tracking you.
Hopefully, you’re feeling more secure now. Remember, it’s all about balance – making the most of tech while protecting your privacy. Stay informed and keep those personal boundaries strong!
